

Crochet is a very easy craft, once you learn a few basic crochet stitches you would be able to create many different crochet projects. If you are an absolute beginner and never tried crochet before then this post is for you, here you will find step by step detailed instruction on basic crochet stitches which are most commonly used in crochet. Once you have mastered these basic stitches then you will be able to create any basic crochet pattern of beginner level.
Our step by step images would make it easier to understand the formation of stitches and this will help you to learn the stitches quickly so that you can start crocheting easy and hustle-free. Keep on practicing, and in a short period of time, you will learn how to hold crochet, how to make the most common beginners stitches, and also a few helpful tips. After learning these stitches you would be able to make may variety of scarfs, shawls, and blankets.
Table of Contents
What is Crochet?
Crochet is a process of creating textiles by using a crochet hook to interlock loops of yarn, thread, or strands of other materials. The name is derived from the French term crochet, meaning ‘small hook’. Hooks can be made from a variety of materials, such as metal, wood, bamboo, or plastic. Read more Wikipedia

How to Begin Crochet
Especially beginners have a hard time understanding where exactly you start and how to select the right supplies. To get started all you need is a right crochet hook, checkout “What Type Of Crochet Hook Is Best For Beginners? 3 Best Ways” this article will help you to select a suitable crochet hook.
For selecting yarn, I would suggest you go for mid-weight, simple cotton or wool yarn. Mid-weight yarn is easier to work as crochet stitches would be easily visible while working. Select light color yarn as the dark or multicolor shade yarn can make the stitches dense and it would be hard to know where to insert the hook while working. I would recommend you to select the yarn depending upon the thickness of the hook.
The below instruction will help you to understand the formation of basic crochet stitches, first, we need to make a foundation base which is a chain stitch base but before that, we need to make a slip knot. So let’s get started with a slip knot stitch.
How to Hold a Crochet Hook?
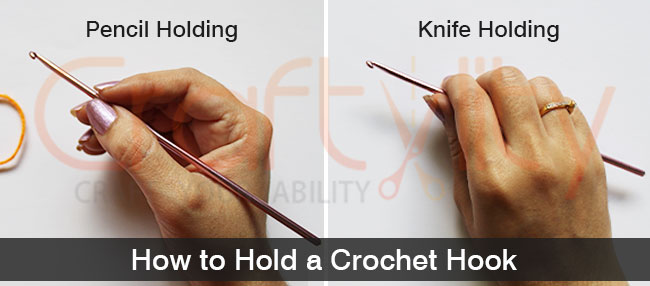
Hold a crochet hook depends on your preferences, first try and experiment, and then find the best way that feels the most comfortable for you. If your hand is not comfortable while holding the hook then this may cause your hand to cramp up and also the stitches will not be even. I am showing you two common ways to hold the hooks, try both the ways and later select the best way for yourself.
- Pencil Holding: First way is pencil holding it is a similar way to hold a pencil. Hold the hook in the same way as you hold a pencil, your thumb and index finger would rest on the thumb rest of the hook and third finger near the hook tip.
- Knife Holding: Second way is knife holding it is similar to hold a knife and your hand will rest on the hook. Hold the hook handle below the hand, resting against the palm and gripping the thumb and third finger on thumb rest of the hook.
While working the hook should be firmly held but not too tight. In the beginning, you will find yourself holding the hook tightly, but once you are used to it you can comfortably work with it.
Note: Instructions in this post are intended for right-handed crocheters; if you are left-handed then reverse the hand positions and orientation.
Also, check out our Recommended Crochet Products, products on this list are handpicked for a better experience.
6 Best Basic Crochet Stitches for Beginners
How to Crochet a Slip Knot
A slip knot is a simple knot and very important as it is the very first thing we do to get started with every crochet project, so learning this knot in the first step of crochet the journey. A slip knot is needed to secure the yarn on the hook to begin crocheting.
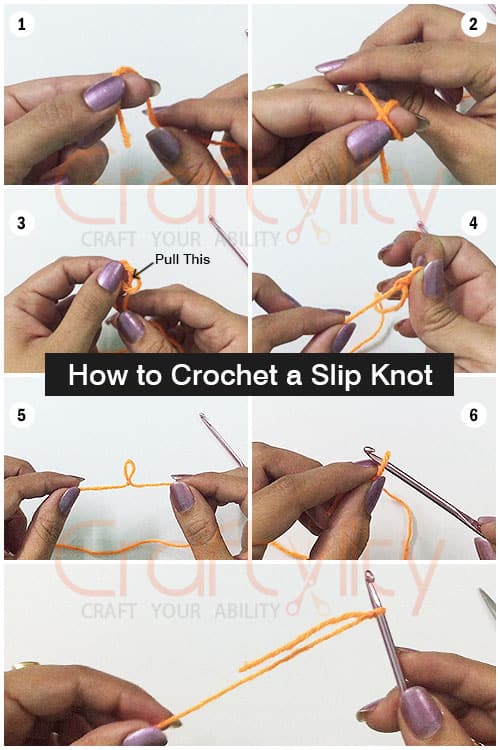
- Hold the yarn in U-shape, for this make a loop of yarn
- Then bring running yarn over the tail of the yarn. The tail should be 4″ to 5″ long hanging at the end. Make the yarn strands cross each other.
- Take your fingers out from the loop and pull the working yarn that leads to the yarn ball.
- Pull the working yarn through the loop to create a small loop.
- Now insert the crochet hook in that loop and pull the tail of yarn to tighten the knot
- Now pull both the ends of the yarn to make the loop tighter, you will now get a tight knot and two strands of yarn, one is working yarn and the other is a tail yarn which is 4″ to 6″ long. This cinched knot is a slip knot.
How to Crochet Chain Stitch (CH)
Once you are done with a slip knot, its time to proceed with a series of chain stitches it can also be called foundation stitches as other stitches build on the foundation of chain stitches. Chain stitch is not only used as a foundation base stitch but also used throughout the crochet projects. Let’s start with the simple formation of chain stitch.
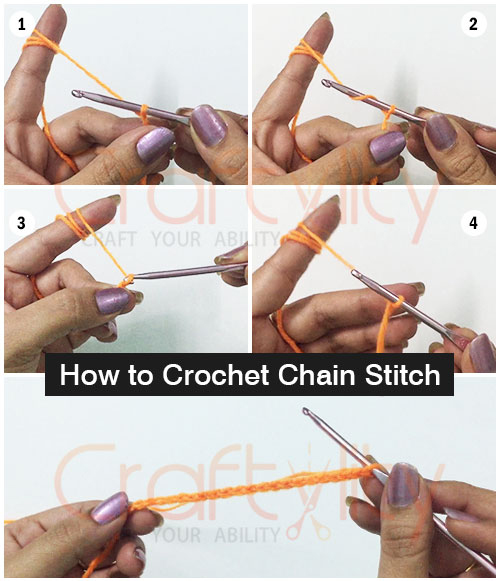
- First, the crochet hook in your dominating hand (i am right-handed) using knife holding or pencil holding, whatever you feel comfortable. Keep the crochet hook facing upward, you will need to rotate the hook to make stitches, so hold the hook loose so that you can move it easily but tight enough to maintain proper control. Now hold the yarn, with the left hand, to maintain proper tension of yarn I have rolled the yarn in the index finger. Keeping proper tension on the yarn is important as if not kept correct then the stitch would be either too loose or too tight. This can take some practice, but it is easy to learn.
- Now loop the working yarn from under the hook to over and again under the hook creating a loop.
- Turn the crochet hook facing down and draw yarn through the current loop to form a new loop without tightening the previous one.
- As you are done drawing the yarn through the loop you have created one chain stitch, now return the hook facing upward as earlier.
- Keep repeating this as many times as necessary. Generally, slip knot is not counted in the number of chain stitches required in a pattern’s foundation chain stitch. Begin the count of chain stitch from the first chain stitch constructed after slip knot.
How to Crochet Single Stitch (SC)
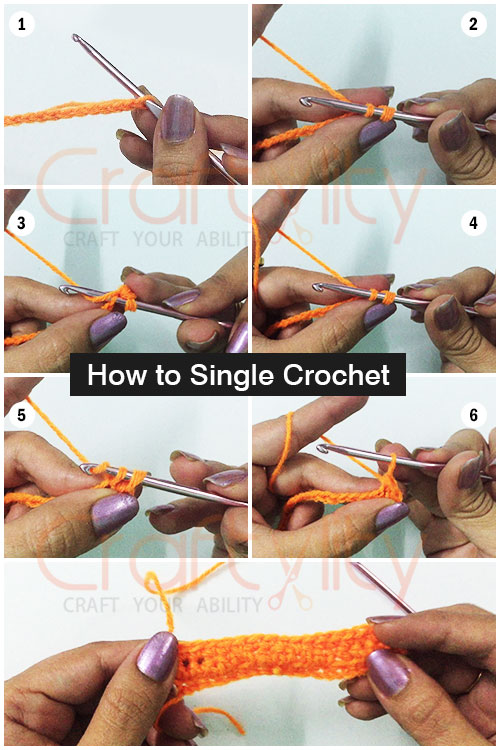
- First, construct the foundation chain stitches, which you have learned earlier.
- Each chain stitch looks like “V” with the tip of the “V” pointing to the left, now insert the hook into the second chain carefully. Now you should have two loops of yarn on the hook and one strand of yarn below the hook.
- Wrap the working yarn around the crochet and turn the crochet hook facing down.
- Pull the yarn through the second chain stitch. Now you will have two loops on the crochet hook.
- Again wrap the working yarn around the crochet.
- Now pull the yarn from both loops, you will now have one loop on crochet.
Repeat the above steps with all the chain stitches and you will get Single Crochet rows.
How to Half Double Crochet (HDC)
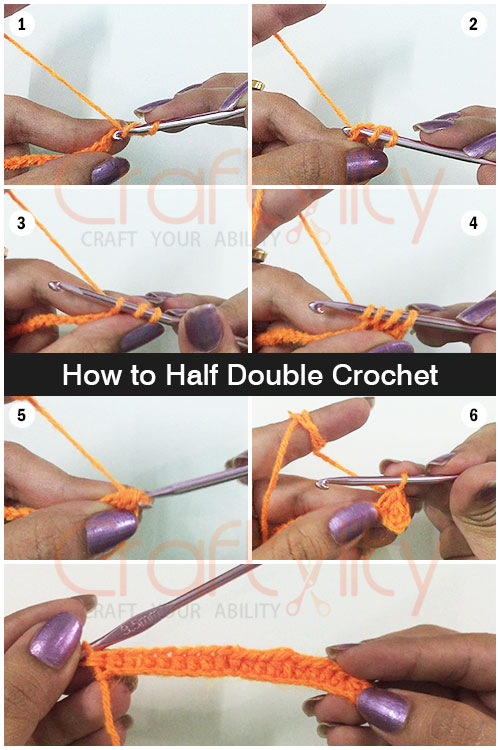
- First, construct the foundation chain stitches. Now wrap the working yarn over the crochet hook and insert the crochet in the third chain stitch (leave first two chain stitches).
- Wrap the working yarn over the hook and pull the yarn through chain stitch (first loop).
- Now you will have three loops on the crochet hooks.
- Wrap the yarn over the hook.
- Pull the yarn through all three loops on the hook.
- One half double crochet is made. Again wrap working yarn over the hook, insert the hook into the next stitch, and repeat the steps again.
How to Double Crochet (DC)
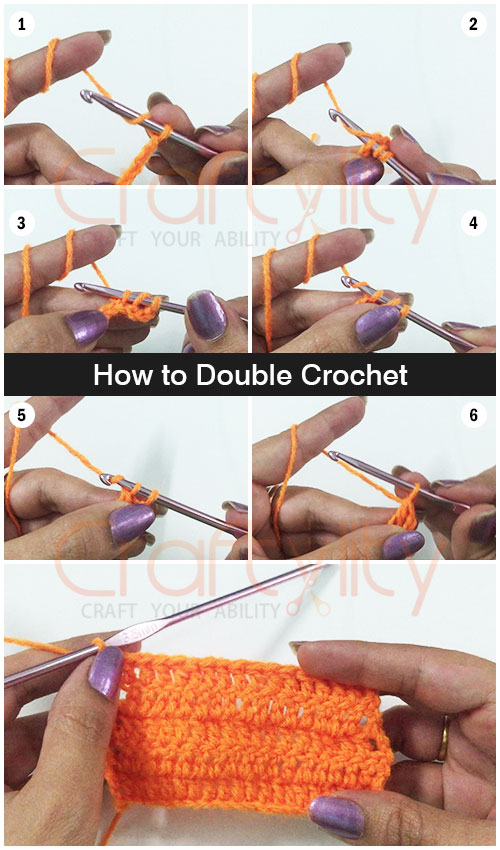
- First, construct the foundation chain stitches. Now wrap the working yarn over the crochet hook and insert the crochet in the fourth chain stitch (leave first three chain stitches).
- Wrap the yarn over the hook and draw the yarn from the fourth chain stitch.
- Now you will have three loops on the hook.
- Again yarn over the hook and draw the yarn through the first two loops only.
- Now you will have two loops on the hook, wrap the yarn over the hook.
- Draw the yarn from both the loops on the hook and thus one double crochet is made.
Again wrap working yarn over the hook, insert the hook into the next stitch, and repeat the steps.
How to Treble Crochet (TR)
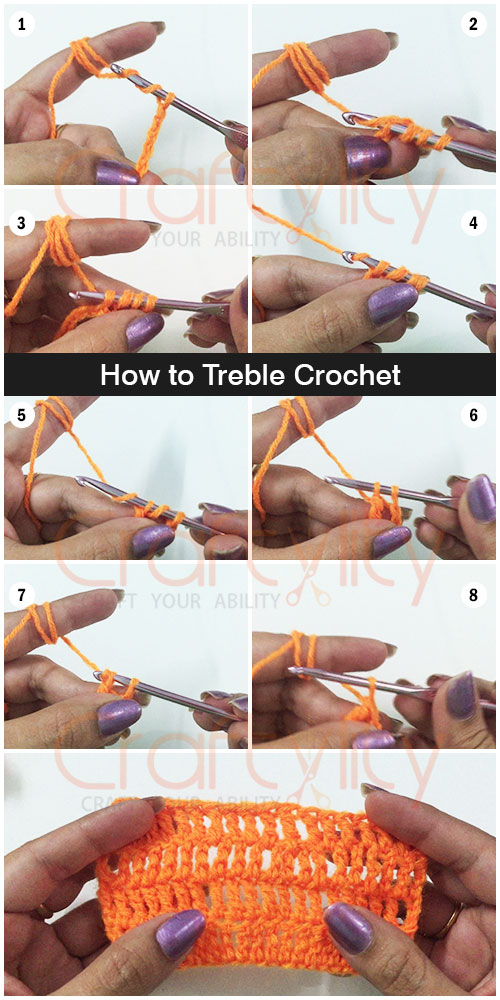
- First, construct the foundation chain stitches. Now wrap the working yarn over the crochet hook twice and insert the crochet in the fourth chain stitch (leave first three chain stitches).
- Yarn over the hook and pull the yarn through the chain stitch.
- Now you will have four loops on the hook.
- Yarn over the hook and draw the yarn from the first two loops, thus you will get three loops on the hook.
- Again yarn over the hook and draw the yarn through the first two loops.
- Now you will get two loops on the hook.
- Yarn over the hook and draw the yarn from both the loops.
- One Treble crochet is completed.
Again wrap working yarn over the hook twice and insert the hook into the next stitch, and repeat the steps.
You may wonder, what is the easiest thing to crochet for a beginner? After learning
After learning the above stitches, you will be able to start with any beginner’s level project. Start with a small granny square blankets or scarf, crochet coasters, Basic Beanie etc. these projects are easy to start.
Crochet Tips for beginners
- Select the yarn depending upon the type of project you want to start.
- In the beginning, select light-colored and mid-weight yarn as in light color stitches are easily visible.
- For everybody working with crochet and yarn is a bit different as there are many ways to hold the yarn and position of the hook. In this post, I have shown my way of working with yarn, you can try other ways and select a comfortable way of working for you.
- Pick a comfortable crochet hook holding way, try both the holding ways and then select one best suited for you.
- Select the best crochet type for you, there is a variety of hook available out there.
- For selecting the yarn and hook, make a small swatch test to check what will work for your project.
- In the beginning, it can be a little difficult to maintain even tension of yarn, but with repeated practice, eventually, your stitches will be smooth and even.
I hope this post helps you to get started with the crochet journey.