

Paper quilling is an amazing and fun art of making beautiful shapes and patterns using paper strips. In this guide, you’ll learn the most important basic quilling shapes for beginners and how to make each shape cleanly. You can make many projects using basic quilling shapes. Paper strips are rolled, coiled, and shaped to create the pattern. It is a versatile craft with minimum requirements. All you need is a few supplies and lots of creativity.
Quilling or paper filigree is an art form that involves the use of strips of paper that are rolled, shaped, and glued together to create decorative designs.
So, the 20 Best Basic quilling shapes guide for beginners includes the easiest and basic shapes. you can create many quilling projects using these basic shapes. This is the best guide for quilling beginners as here you will get step by step instructions on how to make different quilling shapes.
START HERE (Beginner Path)
New to quilling? Follow the beginner setup and practice these shapes in order:
Tight Coil → Loose Coil → Teardrop → Marquise → Scrolls.
✅ Start guide
✅ Shop all quilling essentials
Table of Contents
Tools Used (Recommended)
- ✅ Beginner Quilling Kit (fastest start)
- ✅ 5mm Quilling Paper Strips (easiest to hold for practice)
- ✅ 3mm Quilling Paper Strips (best for cards + detail)
- ✅ Quilling Slotted Tool Set (clean coils, more control)
- ✅ Precision Craft Glue (Fine Tip) (neat finish)
- ✅ Circle Sizer Ruler (same coil size every time)
Paper quilling is pocket-friendly art and for this art, you need few supplies, check out “What do I need to start Paper Quilling with Minimum Budget” this will help you to get started with quilling supplies. For beginners, we would recommend going with a 5mm or 10mm paper strip as this width is comfortable to hold and shape.
Following is the list of the materials you will need to get started with paper quilling. checkout our Recommended Quilling Products here you will get all the materials required for paper quilling.
- Paper quilling strips
- Slotted tools
- Glue
- Scissors
How to start with rolling
Before getting started with basic quilling shapes let me show you the technique of holding the strip and quilling tool.
The slotted tool is a commonly used quilling tool and this tool is widely used by beginners as it has a small slit or cut on the edge of the tool which helps to hold the end of the strip while rolling. Rolling the strip is the very first thing you will learn in quilling. All the shapes are created by creating a coil by rolling the strip with the help of this tool.
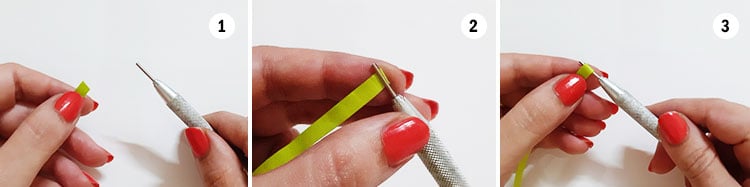
To begin first, hold the tool with your dominant hand whichever you are comfortable with. Hold the tool with its tip on the top like you hold the knife.
Now insert the edge of the strip into the slot of the tool, and try to get the edge of the strip and the edge of the tool into one line. Try not to leave the extra paper strip on the edge of the tool.
Once the strip is set now it time to roll the tool, you can roll the tool towards you or away from you (clockwise or anti-clockwise) whatever you are comfortable with. Hold and maintain the strip firmly with your other hand. Roll the strip till the end and then remove it from the tool, keep it on the desk and allow it unroll. You have just created a loose coil.
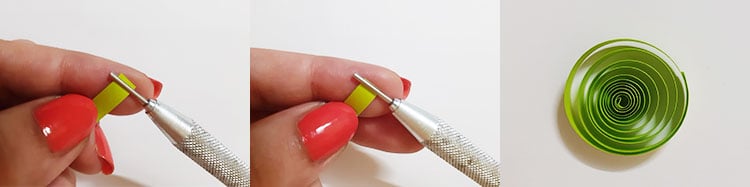
Using a slotted tool leaves a small crimp in the center of the coil and it is natural but if you leave more paper gap it will be more visible in the center. All advanced Quillers use a needle tool to avoid this small crimp in the center of the coil.
Basic Paper Quilling Shapes:
Quick Cheat Sheet (Best practice order)
- Tight Coil → foundation
- Loose Coil → base for most shapes
- Teardrop → petals
- Marquise/Eye → leaves
- Scrolls → fillers + borders
Pro tip: Use a circle sizer for matching petals:
To create a basic shape all you need to know is how to create a paper coil and how many sides are needed to be pinched and also how close these pinched points should be, depending upon the final shape you want.
In the beginning, you will need lots of practice so get ready to play with colorful paper strips and to make creative small quilling projects.
01. Quilling Tight Coil
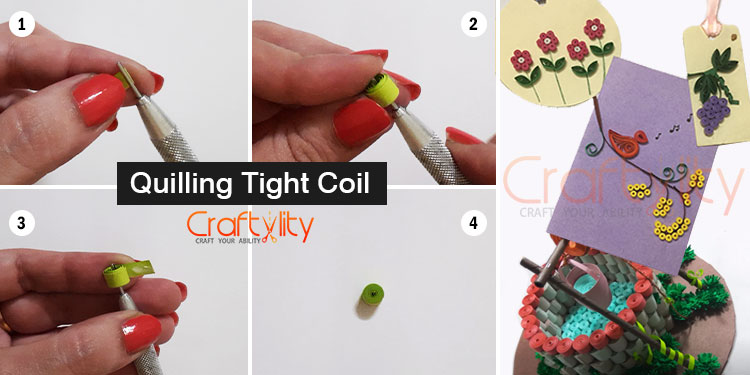
First, we will start with a tight coil and for creating a tight coil you need to insert one end of the paper strip into the slotted tool and start rolling the paper around the tool by holding the paper strip in one hand and the tool by the other hand. Please note that don’t pull or hold the paper very tightly because it may tear the strip or don’t keep it too loose. Maintaining proper tension on the strip is important. After rolling the entire strip glue the end of the paper strip before removing it from the tool. Thus Quilling Tight coil is ready.
If you need a large coil then you have to stick more strips of paper to increase the length of the paper strip. Also, you create coils of more than one color by sticking different colors of strips together and then start rolling with the color you want in the center of the coil.
Tight Coils are commonly used in many quilling projects, you can create tiny flowers on cards or tags. You can also create a beautiful quilling portrait by just adding different colorful coils of different sizes. Have a look at this video in which the majority of work is done by using different sizes and colors of strips and creating various sizes and colors of the tiny tight coils.
This Portrait falls under Ornamental Quilling and you can create many portraits like this.
02. Quilling Loose Coil
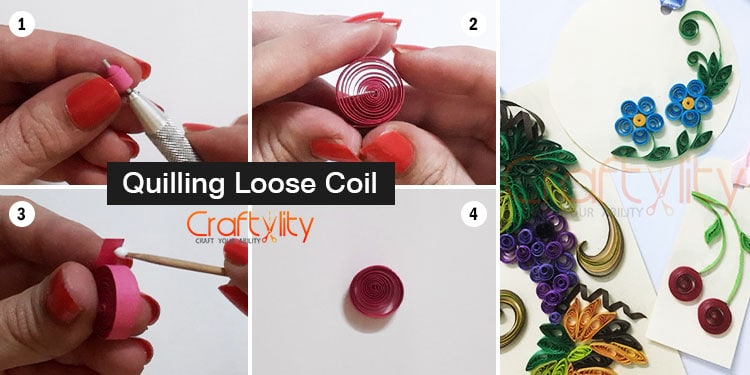
The basic and most important shape in quilling is the Loose Coil. The loose coil is very important in quilling as you can create many shapes by creating the foundation of a loose coil.
Start rolling the paper strip from one end to another with the help of a slotted tool but do not roll the strip too tightly. When you finish rolling don’t apply glue on the edge of the strip. Carefully take the coil out from the slotted tool and keep it on the table and allow it to uncoil, when it stops uncoiling pick it up carefully, and apply glue at the end of the paper strip by using a toothpick or fine glue applicator and stick it. Thus Quilling Loose Coil is ready.
If we need the same size of Loose coils then we have to use a Quilling board or Circular template in which several circles of different diameters are available. Just leave the coil inside of the desire circular shape and allow it to uncoil, once the coil is uncoiled pick it up and glue it. This circle template is helpful for creating the same size of the coils to make flowers, leaves, etc.
03. Quilling Tear Drop:
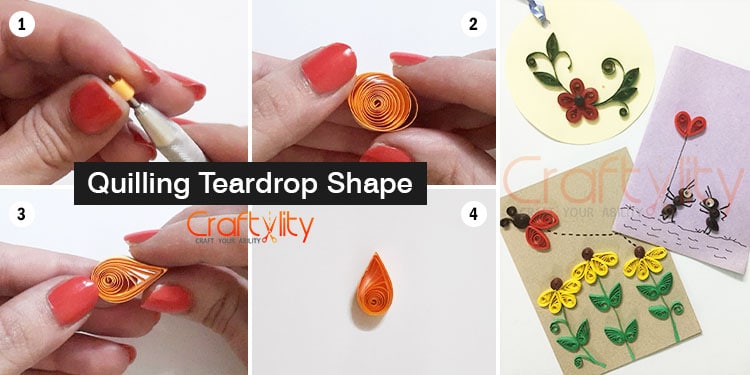
As its name indicates this shape looks like a drop of water. This shape is mostly used for creating petals of Quilling flowers.
So you will first need to create a loose coil and then hold the coil by both hands and gently pinch one side of the coil with the thumb and index finger. Apply gentle force while pinching, only one end of the coil is needed to pinch and this will create the shape of a water drop which is pointed at one end and the other end will be rounded.
To create a Teardrop flower we need to create a minimum of 5 such shapes but don’t forget to use the Quilling board because all loose coils should be of the same sizes. Glue all the petals together to create a teardrop petal shape flower.
You can create ample of projects using teardrop shapes like flowers, leaves and if you glue two teardrop shapes together it forms a heart shape, there is no count on using this shape as it is a basic and most commonly used quilling shape.
04. Quilling Curved Tear Drop:
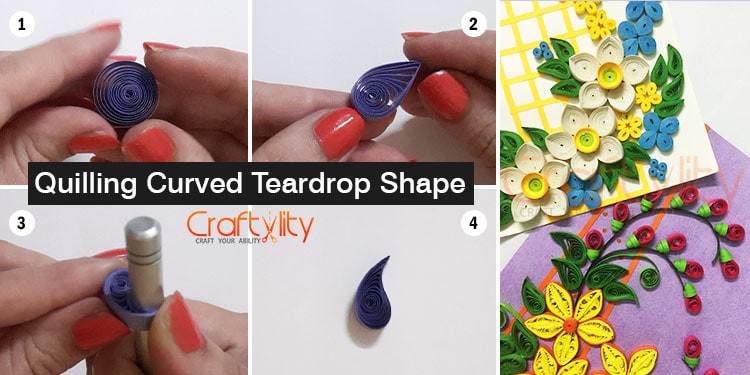
As the name suggests, this shape is a modification of the basic Teardrop shape. First, you need to create a Teardrop shape and with the help of thumb lightly press the pointed end of the teardrop around the round handle of the quilling tool to create a curved petal-like shape.
In this quilling card, you can see that leaves are of Curved Teardrop shape.
05. Quilling Eye shape or Quilling Marquise Shape:
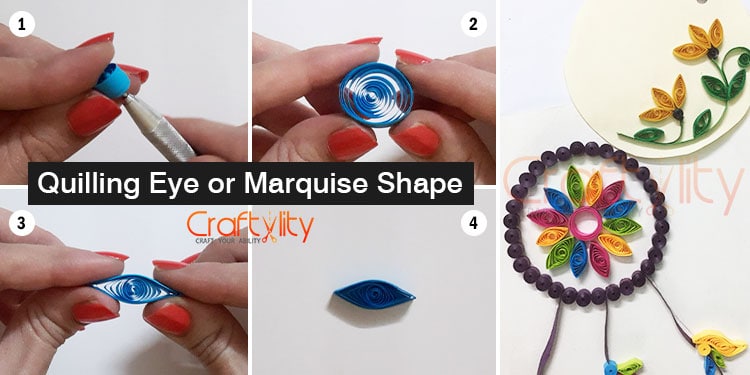
This is another important quilling shape, you can create many other shapes using this shape. For creating this shape first you will need to create a loose coil and hold it with the index finger and thumb of both hands and pinch it gently from both sides. Thus we will get two pointed ends that create an eye-like shape. Eye shape is widely used in many projects like for creating flowers, leaves, mandala, etc.
This card is made by using different sizes of eye shapes, glue the shape in descending order and the Quilling Lavender flower card is ready.
06. Quilling Curved Eye Shape:
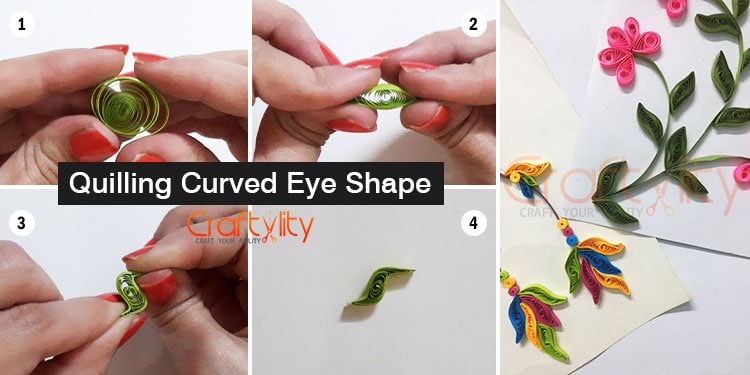
This shape is a variation of eye shape. First, make the eye shape, and with the help of the thumb by applying gentle pressure bend the points in the opposite direction to create an alphabetic “S” like shape. This shape is generally used for making quilling leaves.
This card is made by Curved Eye-shaped flowers, you can also glue a few shapes to create half flower as shown in the card.
07. Quilling Gumdrop Shape:
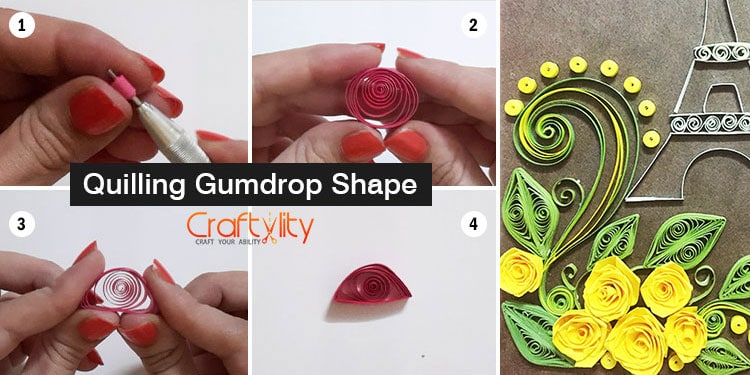
Gumdrop shape is also known as semi-circle shape. For creating a gumdrop shape make a loose coil and with the help of both the hands pinch the coil from two ends creating a half-circle. Please note that do not pinch too harder, we need to create a smooth curve and for that, you need to pinch gently. By sticking two gumdrop shapes you can create petals or leaves for your project, the same as shown in the above image or below video.
08. Quilling Half Moon Shape:
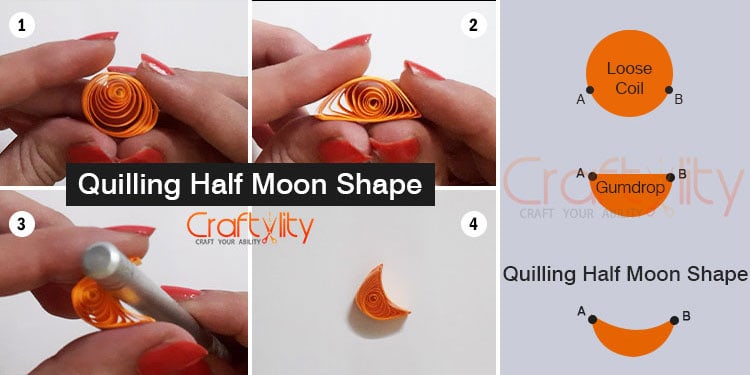
This shape is a variation of the Gumdrop shape, for Creating a half-moon shape you need to repeat Gumdrop instructions after creating the gumdrop shape take any round object pencil, pen, or handle of the quilling tool and press the shape with it, this will help you to get a curve shape which will look like a half-moon. This shape can be used in quilling mandala art.
09. Quilling Square shape:
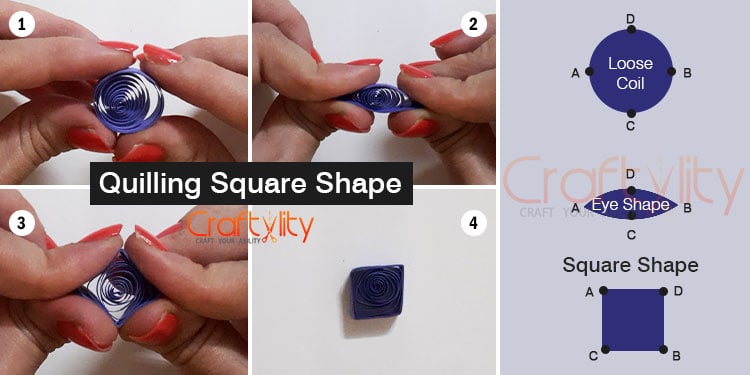
Geometrical shapes are easy to create, the only thing you need to remember is the number and placements of the points to be pinched. To make a square shape you need to first create a loose coil.
Square shape has 4 sides and 4 points, all are of the same size. So you need to first pinch two points opposite to each other like we create eye shape and then hold the eye shape verticle and again pinch two points exactly in the center of the shape means two diagonally opposite marquises. Thus you will get 4 sided square shape.
This shape is not often used in quilling but it can be used to create some fun projects like if you glue 4 square shapes together it can form a large box and glue a small paper bow on its top and your quilling gift box is ready. Many more projects can be made using these shapes.
10. Quilling Star Shape:
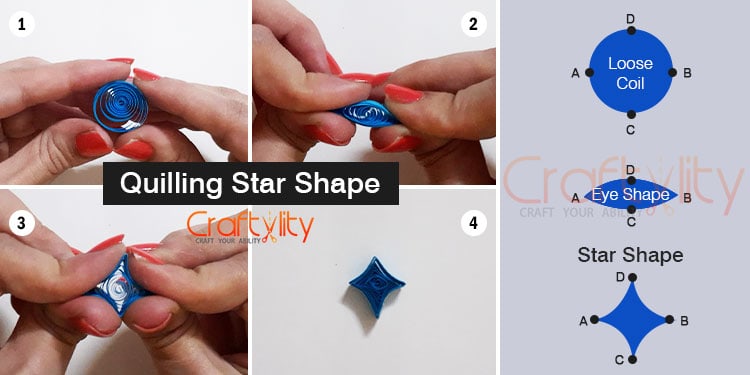
This is a variation of Square shape, for creating a Star shape first create a square shape, but pinch the points a little harder this will create a slite curve between the points and thus you will get a star shape.
Shop the tools used in these shapes
11. Quilling Rectangle Shape:
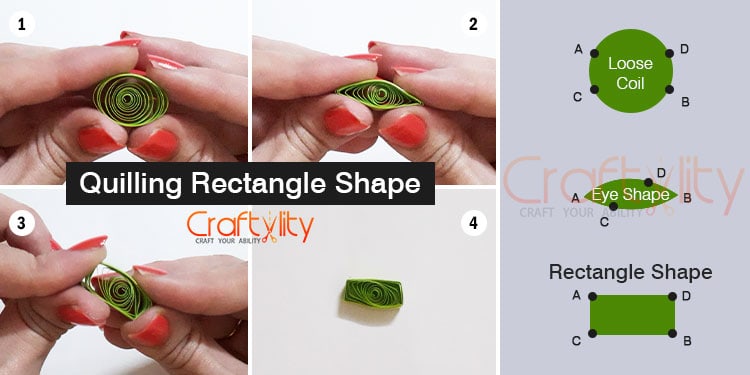
As we know the rectangle has 4 points and 4 sides but two sides are larger and two sides are shorter and for creating a Rectangular shape we need to first decide the pinching point of the coil. First makes an Eye shape and rotate it and pinch again to create two more points but these points will not be in the center, unlike square shape. All points should be placed like a rectangle means it should not be opposite facing like a square.
12. Quilling Diamond Shape:
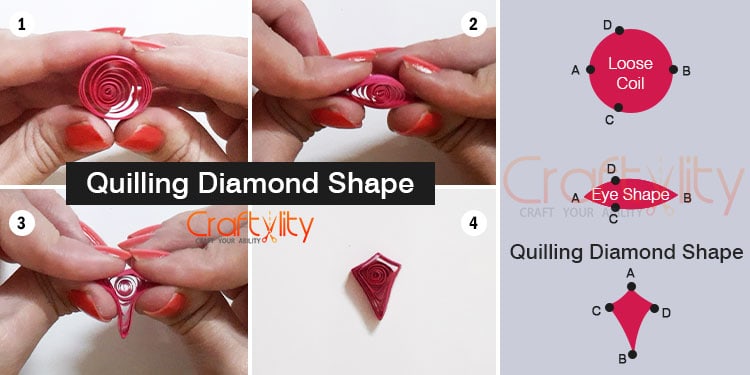
This is the variation of Rectangle shape and creating this shape first create a rectangular shape but for creating a diamond shape just pinch the points a little harder and this will create a curve between the points.
13. Quilling Triangle Shape:
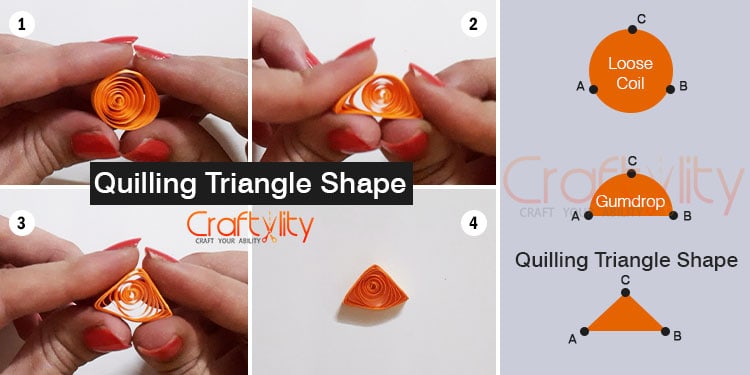
Quilling Triangular shape is simple and for this first, create a Gumdrop shape and then gently pinch the curve side from the center to create a triangular shape. Later pinch all three points to sharpen them. All three sides should be of the same size.
14. Quilling Oval shape:
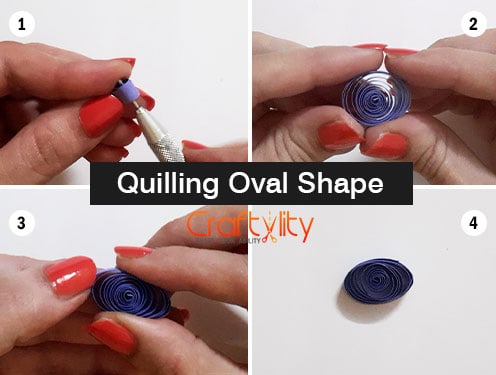
The oval shape has no sharp points so you have to be very gentle while creating it. Just make a loose coil and with the help of your index finger and thumb press the center of the circle very gently and the oval shape is ready.
15. Quilling Duck Foot or Quilling Tulip Shape:
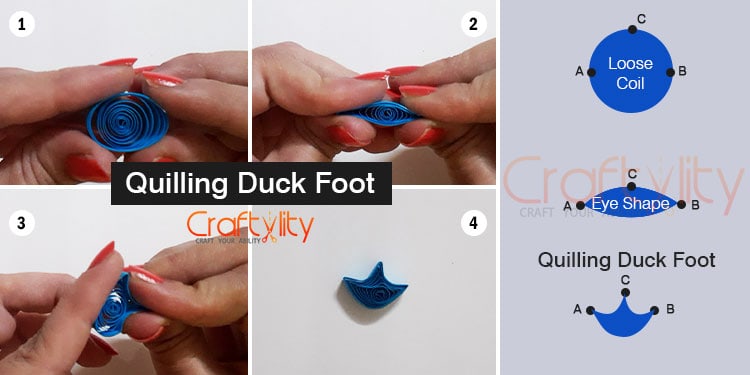
For creating a tulip shape, first, you need to create a Marquise shape and by using the fingers of both the hands pinch a point in the center of the eye shape.
16. Quilling Arrow Shape:
![]()
For creating an Arrow shape, first, create a teardrop shape and hold a thin object like a quilling tooltip to give pressure in the center of the curved part of the teardrop and you can easily pinch two points to give an arrow-like shape.
17. Quilling Heart Shape:
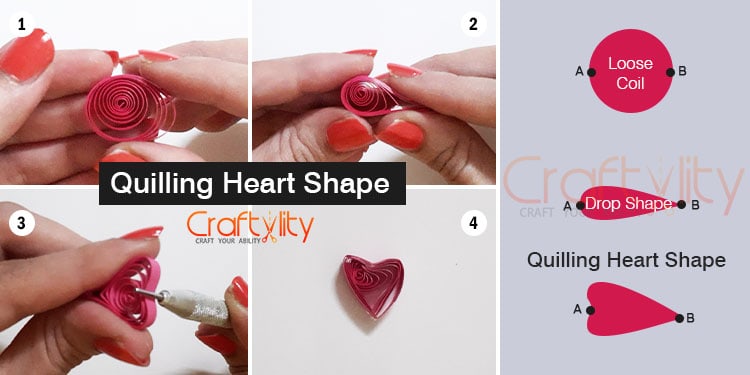
First, create a Teardrop shape, now hold the pointed end in one hand and press the curved side with the help of the tip of the tool or you can also use a toothpick gently press the curved part to create an easy heart shape.
18. Quilling Bunny Ear Shape:
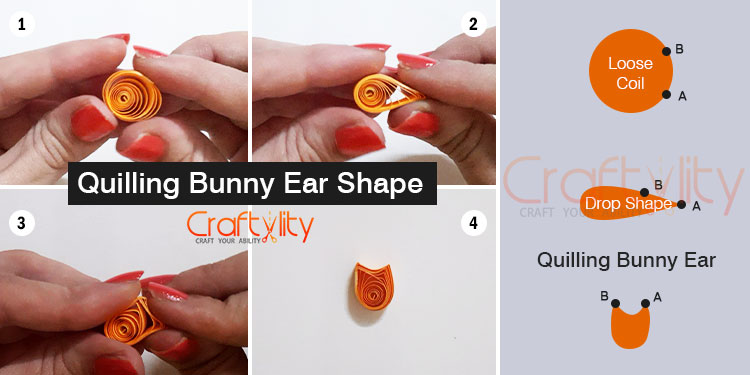
You need to first create a Teardrop shape and then hold the point of the drop and pinch again near the first point to create the second point. Gently apply little pressure between both the points to create a curve, by this quilling ghost shape is ready.
19. Quilling Ring Coil:
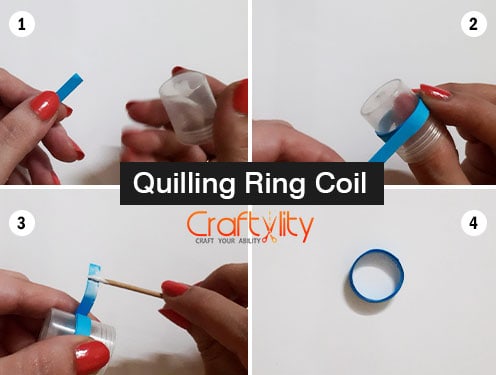
Ring coil is a very common and easy shape to make and it is also a majorly used shape for making quilling jewelry. The ring coil is created by wrapping the paper strip around any round object of the desired radius. Apply glue on the end of the quilling strip before removing it from the object. You can use any round surface like a bottle, bottle cap, or Border Buddy this lool has many circles of different diameters and it is of great use.
20. Quilling Scrolls:
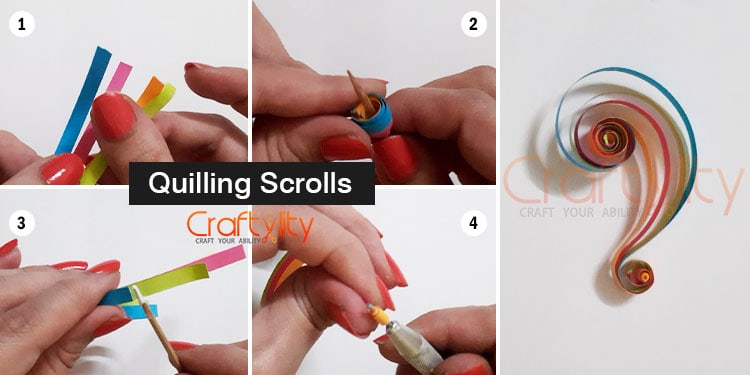
For creating this scroll take 4 different shades of paper strips. the length of the strips is the same. Glue the strips one above another and then roll it using a slotted quilling tool or toothpick. Once the strips are rolled glue another end of the strips together and roll it in opposite direction.
Paper scrolls are another commonly used shapes, these shapes look beautiful and give a charm to any quilling projects. There are many types of different scrolls but the scroll I am covering here is the most common and commonly used. You can use this scroll in any quilling card to enhance its beauty.
If you are a beginner then these basic quilling shapes are great to get started with your creative and beautiful Paper Quilling journey. All you need is a bit of patience and practice. Once you are comfortable with these 20 Quilling Basic shapes you will easily be able to create any desire quilling projects.
I hope you find these basic quilling shapes helpful, you can also check out our Recommended Quilling Products list where you will get all essential quilling tools under one roof.
FAQ
Which quilling shape should I learn first?
Start with tight coil, then loose coil, then teardrop and marquise.
What paper strip size is best for beginners?
Use 5mm for easy practice, 3mm for cards/details, and 10mm for fringe flowers.
How do I make petals the same size?
Use a circle sizer:
What glue is best for quilling?
A fine-tip glue keeps shapes clean:
Tools Used (Recommended)
- Beginner essentials (quick picks):
✅ 3mm Quilling Strips – clean petals & shapes - ✅ Quilling Slotted Tool Set – easy coils, more control
- ✅ Precision Craft Glue (Fine Tip) – neat finishing
- ✅ Circle Sizer Ruler – same coil sizes every time
👉 Want the full list? Recommended Quilling Products
Next Steps
- Start quilling the right way
- Explore more quilling tutorials
- Recommended quilling tools list
- Shop quilling products